For many active readers of the site, the concept of “circular or vertical mastopexy” has become familiar, and inverted T-shaped mastopexy or reduction (reduction) is usually called “anchor breast lift.” From a professional point of view, the concept of “vertical mammoplasty” is a specific concept, a fundamental approach to the technique of performing an operation under the general name “breast lifting or reduction of the mammary glands.”
When performing a breast lift, a plastic surgeon is required to not only “gather” sagging, splayed breasts, but also “put” the newly created wealth into a small vertical seam. In this case, it is necessary to carefully avoid performing a horizontal inframammary suture. In any case, make it as short as possible. It is a known fact that the inframammary suture most often looks unattractive due to its hypertrophy (coarse scarring).
Almost always, when performing mammoplasty, a circular incision is made around the areola, since it is necessary to move (often reduce in size) the areola higher to an aesthetically attractive position. In most cases of mastopexy, a vertical suture is also required. Attempts by some surgeons (sometimes to please patients) to use only a circular suture when there are indications for a full breast lift most often lead to rough scarring of the sutures around the areola (due to strong tension) and flattening (loss of cone shape) of the mammary glands. Foreign authors call the shape of such breasts “Tomato breast.” That is, the chest looks like a tomato. And there is logical, physically and geometrically proven confirmation of this. I can refer particularly inquisitive readers to A.M. Borovikov’s monograph “Ptosis of the mammary glands.”
So. What is important for a surgeon when performing a breast lift? :
- Assessment of the condition of the mammary glands (the very structure of the parenchyma and skin).
- Correct markings.
- Virtual vision of the “assembled” mammary gland when it is still in a “disassembled” state. Call it what you want - experience, intuition, mathematical or vice versa - artistic approach, etc.
- Having some experience in using a different, unplanned method of correction if “something doesn’t go as planned.” In other words, it is not enough for a surgeon to be able to “harvest” the gland in only one way or technique.
- The ability (all plastic surgeons should have this, of course) to “sew” correctly.
The rest, as they say, will follow.
What is important for a patient when performing a breast lift is the ability to find the right plastic surgeon (just kidding). Of course, trust the chosen doctor (logically, calculatedly, or intuitively - it doesn’t matter) and be positively disposed to an excellent result. Of course, that's not all. The rest – everyone has their own views on this point (surgeon’s experience, results, reviews, financial side, etc.).
We will try to explain the above in more detail as we comment on the stages of the operation. So to speak, “put it into pieces.”
Breast lift: assessment of initial breast condition
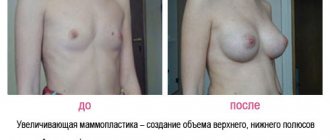
Our patient has grade 2 ptosis of the mammary glands (the nipples are below the level of the inframammary groove), slight asymmetry (the right breast is slightly larger than the left), and the nipple-areolar complex (NAC) is located laterally (outward). The tissues of the gland are elastic and dense. The skin on the chest is of good elasticity, elastic, there are no stretch marks. With this condition of the gland tissue itself - the parenchyma (let’s call it, according to A.M. Borovikov, “filler”) and the skin (let’s call it, probably, a little offensively for patients, the word “cover”), the prognosis for this patient regarding the stability and longevity of the result of the operation will be good . She can plan a breast lift without an inframammary horizontal suture, since there is a harmonious correspondence between the volume of the “filler” and the size of the “cover”, and there is no significant excess skin. For example, in patients with pronounced sagging, stretched gland tissue (the so-called “empty breast”, albeit large in volume), as well as pronounced excesses of sagging skin with stretch marks, the prognosis for the long-term effect of the operation will be much lower, and the result will be less stable . In addition, with this type of operation, it will most likely be necessary to perform an “anchor” mastopexy due to the discrepancy between the physical properties of the “filler and the cover”.
Learn more about each type of operation
We suggest you briefly familiarize yourself with the specifics of each type of surgical intervention:
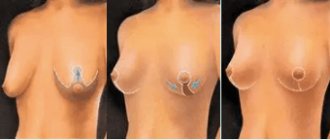
- Pereaoral mastopexy. An incision is made at the junction of the areola and the skin of the breast. After this, a tightening is performed. The method is best suited for those with small to medium breast sizes. Mostly with pronounced fibroglandular parenchyma and mild ptosis. With this operation, you can raise the nipple by no more than two centimeters. If a more radical correction is required, this method will not be suitable.
- Vertical mastopexy. The procedure is indicated for moderate ptosis. The incision is made vertically down from the very edge of the nipple to the point of connection with the fold. After this, the nipple is raised to the required height, and the remaining skin is simply removed. Tissue trauma is insignificant; a long rehabilitation period is not required.
- T-shaped mastopexy. Incisions are made around the areola, as well as horizontal or vertical components. The scar ultimately resembles the letter T, which is how the technique gets its name. This operation is indicated for girls and women whose ptosis is already pronounced and other methods simply will not give the desired result. Or it will be incomplete.
The duration of the operation is on average 2 to 3 hours. The time largely depends on the degree of breast sagging and the size of the mammary glands in general. If the intervention is organic, local anesthesia is preferred. In some cases, the doctor prescribes general anesthesia.
Each operation is performed exclusively in a hospital setting. If the intervention was organic and minor, the patient can go home the same day. If it is large, you may need to stay in the hospital for up to three days. Usually this issue is discussed before the operation. But in some cases, after it is completed, the doctor makes the final decision on the need to keep the patient in the hospital longer or shorter.
Breast lift: preoperative markings
There are many schemes and even marking templates (even patterns) proposed by various surgeon authors. Their number is probably comparable to the many different methods of vertical breast lift (at least several dozen). In his practice, a plastic surgeon, having gone through a certain path and tested many of the proposed methods, usually “calms down” on several of them (usually 3-4). The choice, as a rule, remains with those methods of operation (and, accordingly, marking), as a result of which this particular surgeon obtains the best results. Of course, it is pointless to try all the methods of operation proposed by various authors. Life simply isn't enough for this. Next, the practicing surgeon only brings to “perfection”, polishes the technique of a particular method. And sometimes he supplements the method of operation used with his own nuances, not forgetting to add his last name to an already well-known author in some publications. And in some cases, you can even forget to mention the original source... But this is already lyrics.
In our particular case, I planned to perform a vertical breast lift using an inferior Ribeiro flap. True, in some modification, having spotted this moment at one of the regular events (master classes). Accordingly, the marking, let’s call it a work plan, was carried out based on the chosen method of operation. I will only note the main most important points of marking, on which the result of the operation largely depends. First, the midline is marked from the jugular notch to the xiphoid process. Next, a perpendicular line at the level of the inframammary groove is projected onto it (the midline) (some people are more accustomed to hearing the “inframammary fold”). It is very important to mark the meridian as accurately as possible (to be honest, “by eye” - mathematics will not help here) - a line running from the collarbone through the middle of each mammary gland. This line does not necessarily go through the nipple. As, for example, in this case: the SAH is not in the center of the chest - it is shifted outward. Therefore, the meridian runs a little more medially (inward) from the nipples. The meridian line runs through the entire chest and continues to the chest wall (you can see this in the photo with raised arms).
After the meridian is marked, we determine the upper limit of the edge of the future displaced areola. To do this, measure 4 or 5 cm (depending on what level we want to see the “new” NAO) on the midline and project a perpendicular onto the meridian line. This is a very important point! After all, if the surgeon does not take into account the physical properties of the “filler and cover” and cannot correctly predict the result of a breast lift (that is, postoperative natural gravitational ptosis of the breast), then this author may find himself in an “awkward” position. And the formed SAC will look like a button “highly sewn” to the chest. Correcting this situation (lowering the SAC lower) will not be very, very easy. As you correctly understood, it’s better to under... than
Next we need to mark the lateral boundaries of the vertical leg. This is where we need the meridian line below the chest. Using his palm, the surgeon slightly shifts the breast alternately to the right and left, projecting (marking with a marker) the vertical line of the meridian onto the mammary gland. There is very little left. Connect all these points (upper border of the areola, points of the vertical leg) into one drawing. Around the SAC, the pattern resembles a “mosque roof” - these are the boundaries of the skin being removed. The picture below resembles half a leaf, for example, a birch tree. Even if this seems quite difficult to you for now, I hope that the further course of the breast lift operation will put everything in its place.
All other mathematical calculations and proposals in practice can be erroneous and sometimes even harmful. It is impossible to use standard criteria and numbers when labeling in a stereotyped manner; for all patients in a row. For example, “the distance from the jugular notch to the nipple should be 19 -21 cm,” some authors write. Others argue that if the distance from the nipple to the inframammary groove is more than 7-8 cm, you need to do an anchor lift of the mammary glands, etc. I repeat once again - there are a lot of physical factors of breast tissue that cannot be measured by any mathematical measurements. Plus the individual initial breast structure of each individual, plus wishes for the future shape and much, much more.
Preparing for surgery
Preparation for a breast lift includes several stages:
- visiting a plastic surgeon for examination and deciding on the extent of the planned correction;
- comprehensive diagnostics, including consultations with specialists, laboratory and functional studies;
- giving up alcohol and tobacco;
- normalization of nutrition;
- decreased physical activity;
- elimination of stress and the influence of other unfavorable factors on the body;
- stopping taking medications (in consultation with your doctor);
- hospitalization for surgery.
A month before surgery, it is not recommended to carry out salon cosmetic procedures in the décolleté area or visit a solarium. The day before the intervention there should be a light dinner; food and water are prohibited in the morning.
Technical aspects of breast lift surgery
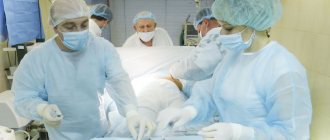
Breast lift surgery is performed under general anesthesia and takes an average of 2-3 hours. Although in simple cases it is possible to perform mastopexy in a shorter time. It is very important for the surgeon to be able to “seat” the patient during the operation. This is necessary to assess the shape of the future breast in the otostatic position. Fortunately, modern operating tables allow you to perform a similar maneuver with one press of a remote control button.
Usually, in order to permanently preserve the “war paint” until the end of the breast lift operation, instead of fancy imported markers (which are washed off or smeared during the treatment of the surgical field), I prefer to use a “strong” solution of potassium permanganate of our domestic production. As they say, two in one: useful (antiseptic) and visual.
Next, when performing a breast lift, a tourniquet is applied to the base of the mammary gland in order to obtain maximum straightening of the areola skin under the pressure of the bulging breast tissue. The concept of “tourniquet” (French tourniquet) in medicine is a hemostatic tourniquet in the form of a fabric or leather loop, twisted using a lever (stick). In particular, during mammoplasty, twisted gauze is used as a tourniquet, pulled under the base of the mammary gland. To form a “new” areola of the appropriate diameter, special markers are used. These are metal circles (in the photo in the lower right corner) of a certain diameter. As a rule, we use markers with a diameter of 4.0 to 4.6 cm in diameter, depending on the wishes of the patient and the aesthetic correspondence between the size of the breast and the diameter of the future areola.
In this case, we used an areolar marker with a diameter of 4.2 cm. The main points on the areola at 12, 3, 6 and 9 o’clock must be marked. In the future, we will need this for the most accurate, uniform comparison of the edges of the wound.
The next step is subcutaneous infiltration with a solution of adrenaline along the boundaries of the future incision. This helps not only to make the correct skin incision, but also to spasm the blood vessels, which means less bleeding.
A skin incision around the areola. The scalpel blade should be directed strictly perpendicular to the skin, which is facilitated precisely by preliminary infiltration.
The skin incision along the boundaries of the marking is completed.
The stage of de-epidermization of the skin (removal of its surface layer to the dermis itself) around the areola. A sign of correctly performed de-epidermization during breast lift is the appearance of blood “dew” - droplets of blood on the dermis of a whitish color. If de-epidermization is performed incorrectly (removing the dermis itself down to the subcutaneous fat), then the capillary network of vessels responsible for the blood circulation of the SAH can be damaged.
The SAH has a well-developed network of feeding vessels running from the periphery to the center of the chest and forming a dense subdermal plexus. In general, the SAH receives a double blood supply - directly from the adjacent parenchyma of the gland and through the subdermal plexus. Therefore, the surgeon performing a breast lift has the opportunity to cut out the SAH on both the dermal and parenchymal feeding pedicle. The types and methods of cutting out dermoglandular “legs” will be discussed in more detail in the subsequent photo report dedicated to reduction mammoplasty. Unlike reduction matoplasty, with mastopexy the risk of SAH ischemia (circulatory impairment) is minimal, since we preserve both the subdermal and parenchymal blood supply.
Next, a flap (“tongue”) on a feeding pedicle is cut out from the tissue of the lower slope of the mammary gland. We will need this “tongue” to move it higher and “put it” under the gland.
Detachment of breast tissue (m.g.) from the pectoralis major muscle (PMM), covered with fascia, is performed. The level of detachment is the upper border of the m.zh. A central tunnel about 6–8 cm wide is formed under the mammary gland. In this case, the detachment should not be carried out too widely to the sides so as not to damage the branches of the arteries (superior external and internal perforating) and not to disrupt blood circulation in the area of the SAH.
After the detachment is completed, we carry out plication (gathering) of the tissues of the upper slope of the breast. by moving and fixing it to the fascia of the femoral bone. To do this, we apply several separate interrupted sutures with absorbable threads (the so-called “suspension threads”). This allows you to “fill” the upper slope of the chest to some extent. .
Deep-epidermization of the skin is performed on the lower flap - the “tongue”. We deliberately do not do this immediately after isolating the tongue. The skin “island” allows us to correctly orient ourselves and not twist the thin feeding “leg” of the flap.
Next, we fix the flap of the lower slope to the posterior layer of the capsule (proper fascia) of the mammary gland. This maneuver is called “autoaugmentation” - increasing the volume with one’s own tissue. Of course, in essence, there is no increase in the total volume of the gland, since “changing the places of the terms does not change the sum.” And yet, with this maneuver, we to some extent reduce the ptosis factor, which is the sagging tissue of the lower slope of the mammary glands.
Most authors who use a lower flap for autoaugmentation (L.Ribeiro and others) in the process of breast lift suggest fixing this flap to the fascia of the femoral bone (a) or even pass it under the muscle “strap” (R.Graf) (b), motivating because this technique allows you to steadily fill the upper slope of the chest. Unfortunately, long-term follow-up of patients does not confirm the stability of the effect of this maneuver. In addition, fixation of the flap to the femoral bone in some patients leads to tissue retraction in the lower part of the vertical incision when raising the arms.
After all “deep internal work” is completed, temporary sutures are placed on the edges of the areola and on the upper edge of the vertical incision.
The assistant lifts the mammary gland with a hook, simulating an orthostatic position. We stitch the lateral “columns” of the mammary gland with separate interrupted sutures using absorbable thread (a), the stitching stage is completed (b).
Temporary sutures are placed on the skin. The most exciting moment for the operating team is coming.
The patient was transferred to an orthostatic position for a preliminary assessment of the shape of the right breast - the difference between the right (“collected”) and left breast was clearly determined. (A). It is very important to evaluate the shape of the breast in the position of orthostasis (the effect of gravity), even if the “collected” breast looks great in the lying position. Additional “adjustment” of the shape of the breast: small excess skin around the areola was marked (with potassium permanganate) and it was determined that it was necessary to remove some skin in the area of the inframammary fold to obtain optimal roundness of the lower slope of the breast (b).
Excess skin around the areola is excised. As you can see, our “notes” on the areola were preserved during the operation. They will help us correctly form the roundness of the future areola.
Symmetrically with the marks on the areola, marks are projected onto the edges of the skin incision - at 12, 3, 6, 9 o'clock and in the middle between them. This will allow us to distribute the seams as evenly as possible and bring the shape of the areola closer to the “ideal” circle. Applying a Hammond circumareolar suture using Gore-Tex thread on a straight needle at the final stage of breast lift. We deliberately use Gortex - it is a non-absorbable thread (the areola will not spread in the future), smooth and inert (does not cause inflammatory reactions in the tissues). Additionally, a marked area of skin at the bottom of the vertical seam will be removed.
Final assessment of the result of breast lift in the orthostasis position before skin suturing. You can see the difference between the “collected” right and “untouched” left mammary glands. Mastopexy on the left will be performed in a similar way.
The final appearance of the mammary glands after skin suturing. Rubber outlets (drains) are left in the wound. To prevent circulatory problems in the areola, papaverine injections were made.
How is a breast lift performed with threads?
At the consultation before the procedure, you decide on the type and number of threads. The doctor outlines the direction of insertion of the threads.
The procedure is carried out in the clinic in one day, no hospital stay is required. Local anesthesia is used to make the installation of the threads comfortable. The chest is treated with an antiseptic solution. The peculiarity of the reinforcement is that the punctures are incredibly small, and subsequently there are no traces left of them.
Using a thin needle - a cannula - the threads are inserted under the skin, brought out and stretched to form a taut frame. The edges of the thread fibers are secured with small clamps. After insertion, the thread firmly occupies its place in the soft tissues and subsequently does not move.
In total, reinforcement lasts no more than an hour. At the end of the procedure, you can immediately go home or work.
Breast lift: recovery period
Drains after a breast lift are usually removed the next day during dressing. Next, the patient is recommended to wear supportive compression garments (tops), treat the seams with alcohol, and dry them with potassium permanganate. To reduce swelling and resolve bruises and hematomas, ointments (traumeel, bepanthen, lyoton, etc.) are used. Showers are allowed for 3-4 days. Heavy physical activity, sports, visiting baths, saunas are not recommended for 3 weeks. The sutures cannot be removed, as the threads are made of absorbable material. Only the “tails” of the threads sticking out on the skin are trimmed on the 8-10th day. Next, the patient glues special Steri-strip strips to the edges of the wound for 3-4 weeks to reduce the load on the sutures and better scar formation. After 1.5-2 months, we recommend wearing special silicone patches (Mepiform, etc.).
Your questions
Is lactation and feeding possible after surgery? During mastopexy, the mammary gland is not affected, so breastfeeding after such an operation is possible.
How long does the effect last after a breast lift if you follow all the recommendations? The effects of a breast lift last until you begin to lose a lot of weight. A sharp weight loss (10+ kg) after surgery can negatively affect the result, so if the patient is planning a significant weight loss, then this must be done before surgery.
Does breast sensitivity disappear after periareolar mastopexy? A decrease in the sensitivity of the skin of the nipples and areolas is possible, but in most cases the sensitivity is restored, remaining reduced in only 14-15% of women.
What is the difference between breast reduction and breast lift? If the ptosis is glandular in nature, i.e. the gland is filled with glandular tissue and sags, and you want to “get” a small gland as a result of the operation, then reduction mammoplasty (reduction of the mammary glands) is indicated. If the gland is large due to stretched skin and a small amount of glandular tissue, then in this case you can get by with pexy (breast lift).
How long after stopping breastfeeding can I have a lift? A minimum of 6 months must pass after stopping breastfeeding.
Result after breast lift
The preliminary result of breast lift surgery can be assessed after 3-4 weeks. The final formation of the breast occurs by 3 months. Up to 6-8 months, the scar “experiences” the stage of maturation (it is red, dense, sometimes slightly convex, etc.). After which it gradually brightens, thins out and becomes unnoticeable. Of course, the quality and type of scar largely depend not only on the “sewing” technique and the threads used, but also on the individual characteristics of the body.
View of the patient 6 days after the vertical breast lift surgery. Bruises are still visible, with yellowness characteristic of the last stage of their maturation. The seams are “tinted” with a strong solution of our favorite potassium permanganate. Of course, the upper slope looks well filled after the “internal work” we carried out. But, to our great regret, a natural prolapse of the gland tissue gradually occurs under the influence of gravity. As a result, the breasts will have a beautiful, teardrop-shaped shape, and the vast majority of patients are quite happy with this type of breast. In any case, patients rarely return to us for breast augmentation with implants after mastopexy.
View of the patient one month after breast lift surgery in comparison with preoperative photographs. The shape of the breast has undergone virtually no changes compared to its appearance in the early postoperative period. In conclusion, I would like to note that mammoplasty is one of the most “interesting”, spectacular and at the same time quite complex operations. Many steps cannot be “calculated” and there are no templates that can be used in each case. The physical properties of skin and gland tissue (firmness, elasticity, rigidity) cannot be measured or calculated mathematically. But let's be fair. All of these factors can be attributed to most operations performed by surgeons. Maybe that’s why there is no more interesting specialty (as they say, IMHO) than surgery. And what if it’s plastic surgery!…
Method of operation
Breast lift mammoplasty is performed using one of three methods:
- periareolar,
- vertical,
- T-shaped.
The periareolar incision is made in a circle and runs along the edge of the nipple areola. The technique is suitable for women with slight ptosis and small breast size. In cases of more severe ptosis, a vertical method is recommended, which also includes an incision from the lower edge of the areola to the fold under the breast. Finally, significant degrees of ptosis are corrected through a so-called “anchor” incision, which combines a periareolar, vertical, and submammary crease incision. The combination of three cuts looks like an anchor, hence the name of this method.
The result of a lift combined with augmentation with implants, performed at the Osnova clinic.
What a breast lift looks like depends on the surgeon and his choice of the appropriate technique based on the patient’s individual data: degree of prolapse, age, anatomical features, and so on.